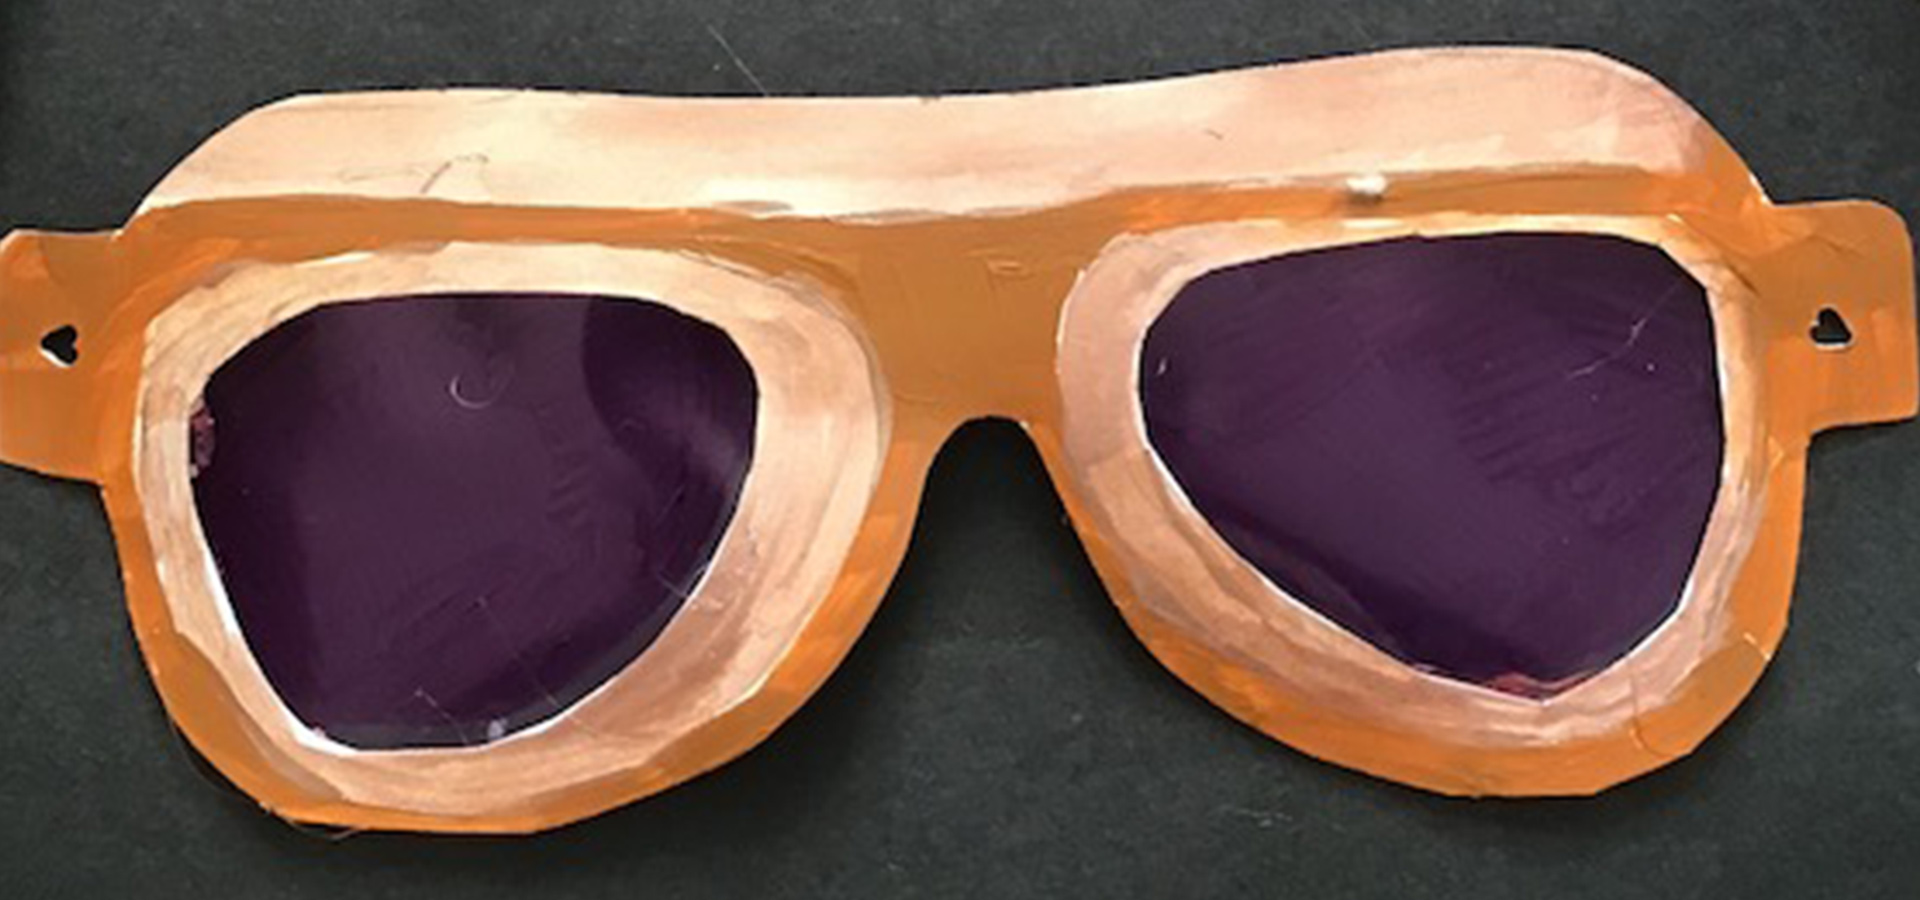
Glowing Moto Goggles
Sponsored by
RECOMMENDED AGE LEVEL
Recommended for ages 8 and up with adult supervision.
PROJECT DESCRIPTION
Sometimes you just need to get out for a night ride! Whether incorporating a moto theme into this year’s Halloween costume, or just sprucing up your everyday riding gear, these glowing goggles will give you some extra funky flair!
MATERIALS
Cardstock or thin cardboard
Scissors
Hole punch
Two colors of markers or paint
Two thin bracelets glow sticks
Hot glue if available; white glue or glue stick if not.
Strip of fabric
Pipe cleaner
Plastic or page protector
Image of motorcycle goggles
Pair of your own sunglasses


INSTRUCTIONS
- Sketch the shape of your goggles on a piece of cardstock. If you have a pair of your own sunglasses nearby, match the width of the goggles to the width of the sunglasses. Make the goggle lenses as large as can be comfortably worn.
- The sample sketch is based on images of retro motorcycle goggles. To create a similar effect, draw inner circles around each eye, and a line across the top. Make sure to draw an extension out past each eye to attach to the strap.
- Cut out the goggles. Use a hole punch or the point of your scissors to cut out the interior of the glasses.
- Create your lenses. If you have colorful plastic to use as lenses, trace the shape of each lens onto that plastic. If not, use a permanent marker to color on clear plastic or sheet protectors as shown. Place the goggles under the plastic to guide your coloring, going a little outside the lines.
- Cut out the lenses from the plastic. You can cut both out as one piece, including the bridge of the nose, or cut each lens out separately.
- Glue the lenses to the back of your goggle frame. Hot glue will help strengthen the frame of the goggles, but other glue will also work well. Repeat any gluing as needed to firmly stick the edges of the lenses down. Allow to dry.
- Turn the goggles over. Use a marker or paint to add color. One color will surround the eyes and extend across the top of the goggles, and the other will cover everything framing these places. Allow to dry.
- OPTIONAL: Use one of these colors on your fabric strip. If the fabric is patterned, consider leaving it as-is for some extra visual interest.
- Punch holes in both sides of your goggles, and on each end of the fabric strip.
- Cut the pipe cleaner in half, and thread it through the side of the glasses, and through the hole in the fabric strip. Try the goggles on to make sure they will fit, and adjust the length of the pipe cleaner. Twist the ends of the pipe cleaner back to secure.
- OPTIONAL: Outline separate colors with a permanent marker, or add any finishing touches.
- When ready to wear with a glow, crack your two glow sticks and bend each into a bracelet, securing with the small plastic tube. Place a strip of glue at the top of each lens, and press the glow stick down. If needed, add extra glue.
- Wear your goggles in a light or dark place!
- TIP: If you don’t have glow sticks, try neon-colored pipe cleaners as accents for your goggles.
CONNECT SOCIALLY AND LEARN MORE
![]()
![]()
Share your project! Post and tag #MCDatHome
UPCOMING EVENTS

Free Summer Weekend!
July 25 - July 26
The Fabric of Celluloid: A Conversation with Dr. Alla Gadassik
August 1 @ 1:00 PM - 3:00 PM

Craft + Chat Workshop with Greg Climer
August 15 @ 1:00 PM - 3:00 PM